Y'all Chairish is an incredible online marketplace for vintage furniture, decor & other 'liciousness, that needs to be in y'all's LIVES. Like NOW. They reached out with a PJ Decor challenge to see how I would #styleslap a tired armoire to make it sassy & Spring ready. So hang on y'all, 'cause there's a lot of chic about to be served and I don't want anyone gettin' hurt!
To rev up the DRAMA, all of the items I'm putting down are available on Chairish. BUT: they're all currently for sale, so if you see something, don't just say something-- y'all better CLICK with a white hawt frenzy!!! Don't want to buy right now? Fine too-- there's still all kinds of tangy styling tidbits to take away! And I'm doing three different posts this week filled with yummy. No one leaves here hungry, TRUST. Let's get into it!
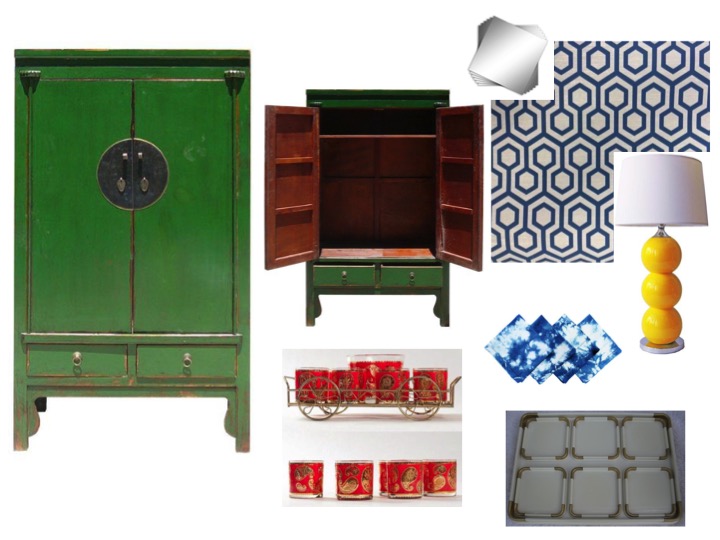
Y'all armoires are so great b/c they can be anything you need them to be in your space! They're total WERK horses. And Chairish has a TON of amaaaze armoires here but I saw this green goddess avail here and she SCREAMED at me: 'I'm a BAR!' And I pay attention when screamed at, so here's what I did:
I'm a BAR, BETCH!
Ohhhh yasssss YOU ARE! How to make this?
- First remove the adjustable shelf, then line the back of it with that fab graphic wallpaper avail here...YES GURL, Chairish has wallpaper! I'd prob just decoupage the paper in place which is way easier than messing with proper wallpaper installation, etc.
- Next, I'd place that adjustable shelf back in, but at a comfy height for standing & mixing a cocktail & also where that amaze yellow lamp, avail here, can fit with enough clearance. Incidentally, that will also buy y'all enough clearance for your bottles, mmmmm k? We're gonna put those on top of that white lacquer-n-brass tray situ, avail here, (w/matching coasters) & just styleslapped y'all six ways to Sunday. Uh huh. Btw: I can't tell from the pics if this armoire has a hole in the back for cords/electrical, but that's a super easy fix with a drill & the proper drill bit. If you don't want to mar the back of the armoire, you can also go up from beneath it to make your cord hole, you just need to remove the drawers and suss out how many layers you're going to need to drill through...but not impossible! Make sense?
- Now that we've brightened up babygurl AND made her functional as your bar, we're gonna add more fun stuff beside our tray on the shelf: the vintage barware set, avail here, which includes an ice bucket on that cute caddy! I KNOW-- tots adorbs. And a little stack of these napkins, avail here, which my knees just buckled over. I CAN'T.
- Since I want as much DRAMA GLAM as possible here, I'm also adding these 12" x 12" mirror tiles, avail here, to those inset panels on the insides of each of the armoire doors with some construction adhesive. Do y'all follow me? See those six spots (3 on each door) just begging for some mirror bling? Yasssss!
Now, THAT'S a bar cabinet that y'all can get your LIVES in!!! And another great thing here is that if y'all were to ever get tired of the bar cabinet situ, the armoire can get repurposed yet again to serve in whatever other capacity you need her for, even with the small modifications that were made! SO go on then and get y'allselves to CHAIRISH!